أنشئ حسابًا أو سجّل الدخول للانضمام إلى مجتمعك المهني.


The Views/Section Which Cannot be seen from the Top,Bottom, Right,Left, Front & Back. It always inclined.

Good Answer, Syed Shan haider.
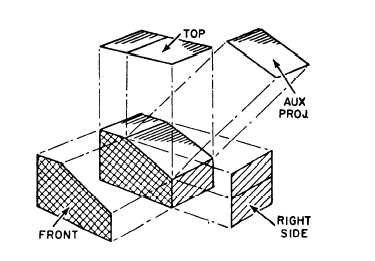
Auxiliary views shows the true shape / size of a feature or the relation ship of part features that are not parallel to any of the principle planes of projection.
Any view that lies in a projection plane other than the Top (Horizontal), Front (frontal), Side (Profile) plan or a plane parallel to one of these three (Bottom, Back, Opposite side) is called an auxiliary views. This type of projection is essential, if the part to be drawn is parallel and has a verity of lines or surfaces that are not parallel to one of three principle planes.

I agree with answer, Mr. Syed Shan haider... Thank you

Thanks to experts
I agree with you

Thank you experts nothing to add ..

I am not working with this program ..however that is what I have found
Orthographic Views, Sectional Views, Auxiliary Views, Dimensioning and Tolerancing Practices. Engineering Graphics: AutoCAD, Inventor, Standard Drawing Practices, ...3D Modeling and Visualization: 3DS Max, Modeling, Material Mapping, ...


