Register now or log in to join your professional community.

1. Click the Printing Options tab.
The printer driver sends the information to Word about which way the envelope should be loaded into the printer. This information is displayed on the Printing Options tab of the Envelope Options dialog box.
The envelope in the illustration below is positioned to the right, face down, flap at the top, and the short edge is being fed into the printer, in accordance with the settings in the dialog box shown above.
2. Load the envelope as indicated in the dialog box.
Click OK.
3. Type some test text in the Delivery address box, and then click Print to print the envelope.
4. Verify that the envelope was printed correctly.
5. If the envelope was not printed correctly, do any of the following:
Consult your printer information, if available, to find out how to load envelopes into the printer.
6. Go back to the Printing Options tab in the Envelope Options dialog box, and make adjustments to the printing options. Print the envelope again. Repeat this process until you discover a configuration of printing options that yields the results that you want.
7. When you print the test envelope correctly, note the settings on the Printing Options tab in the Envelope Options dialog box so that you can replicate them later, during the mail merge.
8. If your verification of the printing settings reveals that you need to make adjustments to the settings, click the Printing Options tab, and make the necessary adjustments.
9. When you finish, click OK.
posted Yaseen

Suppose that you're Using Office2007 at least :
1- Firstly First Type the Address you want and select it
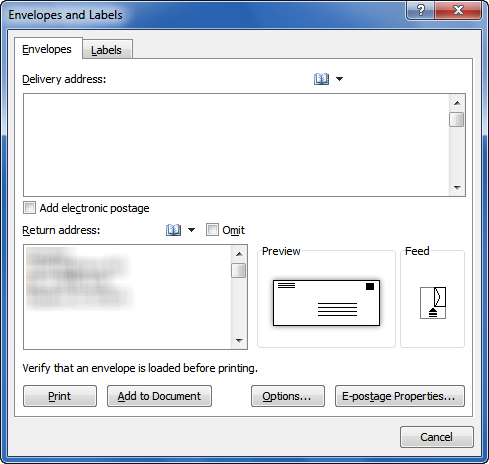
2- From the Mailings tab > Envelops .

3- You will notice that the Address is copied Automatically if you want more options like Envelope Size or Address Format click on "Options" .

4- Click On Print and select correct Printer settings depending on your printer Manufacturer Finally Click Ok And insert the Envelop to Printer and you're Done
Hope this help you …Best Regards .

 , and then click Word Options.
Word stores the address so that you can use it whenever you want to insert your return address in an envelope, label, or other document.
Before you run a batch of envelopes through your printer, you can verify that the printer options are set up correctly.

The printer driver tells Word which way the envelope should be loaded into the printer, and this information is displayed in the Printing Options tab of the Envelope Options dialog box.
 The feed method determines the position of the envelope (right, middle, left) and whether the long or short edge is being fed into the printer.
 The envelope can be face up or face down. The face is the side that the address is printed on.
 If the envelope is fed short edge first, the envelope may need to be rotated to prevent the text from appearing upside down on the face of the envelope.
The envelope in the illustration below is positioned to the right, face down, flap at the top, and the short edge is being fed into the printer, in accordance with the settings in the dialog box shown above.

The above images were excerpted from Training on Microsoft Office Online.

If you want to use an address in the electronic address book installed on your computer, click Insert Address  .
.
If you want to use an address in the electronic address book installed on your computer, click Insert Address  .
.
If you do not have an electronic postage program installed, Microsoft Word prompts you to install one and offers to connect to the Microsoft Office Online Web site. There you can get more information and links to other sites that offer electronic postage.
Word adds the envelope to the current document as Page1. If you want, you can use the rest of the document for typing correspondence that will automatically be stored with the envelope.
To print the envelope, insert an envelope in the printer as shown in the Feed box on the Printing Options tab in the Envelope Options dialog box, click Add to Document, and then click Print.
Note If you want to print the envelope without printing the rest of the document, enter Page1 in the Print dialog box. In the Page range section of the Print dialog box, click Pages, and then type 1 in the Pages box.

Follow any of the above or just press "F1" on your kay board and you will get a tutorial. But is not the forum to teach these kind of tasks, i believe.

To be honest, I did not quite understand what the problem of typing is. Try the human transcription service This is the perfect solution if you want to get the result quickly and without errors. I have been cooperating with these guys for several years and vouch for the quality of their work.


